On a budget? This easy DIY guide will help you make your dog a customized crate without breaking your bank!
Dog crates can be expensive, like almost $200 dollars expensive, at least for the extra large size. So my only option was to build it, I knew just what I needed…
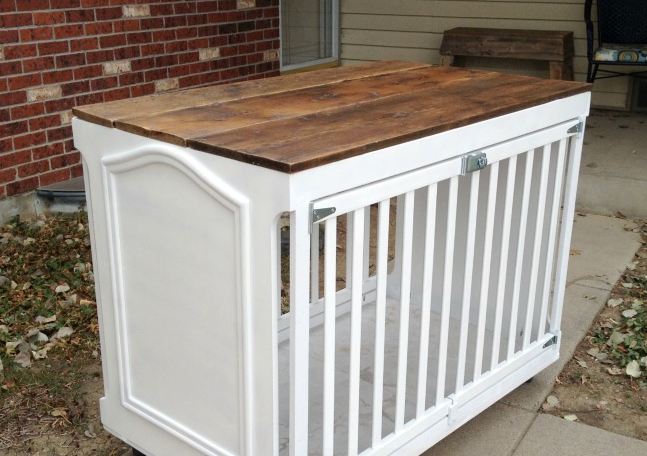
A Crib! This crib was solid wood and great quality, perfect.
The first thing I needed to do was determine my crate size. I looked online at extra large crates to see how big they were, and let me tell you they are HUGE!
I made it 27 inches wide, 46 1/2 inches long, and 33 inches tall.
I got rid of the long side boards as well, they made it too wide to fit through the doors.
Once the ends were cut to size I was able to figure out how to make the sides.
I cut down the crib rails and my 1×2’s and 1×3’s to make the sides.
Next up? Pocket holes!! I know when I am drilling pocket holes it is almost time to build and I get excited. I used my Kreg Jig to drill all the frame pieces. I also added pocket holes on the long pieces for attaching my top and bottom boards.
I only drilled pocket holes in the back crib rail. The front rail will be on hinges so it didn’t need them, but it did need to be cut in half.
Using my Kreg Right Angle clamp to help me out, I attached the frames with gorilla wood glue and 1and 1/4 inch pocket hole screws.
I also had some wood splits here too, but in the crib wood, more gluing and clamping. I always check my settings when I drill pocket holes, so I know that isn’t the reason.
My father in law gave me some free plywood that his neighbor was throwing out and I used my biggest piece for the bottom of the crate.
After I cut it with my circular saw I brought it in to see how it fit. I just popped it on the top.
Since I didn’t have any wood big enough for the top of the crate, I had to improvise.
For my gate I needed a way to make it so the doors didn’t swing in or out. I put a piece of wood on the bottom with a screw and washer (left) so I could turn it up to help keep the doors closed.
Then I painted it white.
While the paint was drying I glued and used bar clamps on a couple of my top boards that needed some TLC.
At the last minute I decided to add casters. I have had a stash of them hiding in my garage for almost 2 years. I found them on the curb in my city’s spring clean up, sa-weet! They just needed a good scrubbing before I attached them to the bottom of my crate.
I ended up just nailing the top wood pieces on. I sanded them and sealed them with 3 coats of poly, no need for staining on this old wood.
I spent less than fifteen dollars for the hinges and this bolt thing. So I guess my total for this crate was just under $25 dollars. I am actually loving the bottom piece of wood that I just turn, it would have been fine to have one on the top too, that would have saved me 5 or 6 bucks.
And a close up of the nice marble vinyl floor! It is super smooth I am really glad I put it in, even if I can’t lay it totally straight, lol! I filled in the small cracks with spackle, an easy fix.
Sunny LOVES it!
I just have to make a nice pad for her, but an old comforter works for now.
WOW! That was so easy! Now you can spoil your pooch with his unique doggy crate! You'll show off your creative and handy skills while saving a ton of money. How smart!
For more on this amazing DIY doggy crate idea, be sure to visit My Repurposed Life.


Michelle Kinzel
- Edit
Alicia Sammut
Lee Randall
- Edit
Katie Randall Rios
Ashley Bea Reynolds
- Edit
Chris Reynolds can you make one?
Donna Chaney
- Edit
Neat looking
Jeri Gross
- Edit
Won’t most dogs chew on the wood?
DanaLynn Goddard
- Edit
WHAT A GREAT IDEA….
Tara O'Hagan
- Edit
Alison Nicole
Mary Fay Monfre
- Edit
Darin Monfre you can make this
Darin Monfre
- Edit
Of course I can make this. ….I can make anything
Elizabeth Doherty
- Edit
My fur baby will chew it up
Pamela Beitel
- Edit
Good idea
Edward Piercy
- Edit
I found my dear Sasha in a cage with her two sisters. They were selling her like a COMMON ANIMAL! But I RELEASED her from her$#%&!@* 🙂
Sue Adensam Bergemann
- Edit
Mine would eat thru the wood.
Valerie Lockhart
- Edit
Great idea
Carmen E Rodriguez
- Edit
Nice, love it!
Castillo Andrea
- Edit
Right now you’re probably reading this message because you’re desperate to finally learn how to not only train your dog quickly and effectively, but you also don’t want to have to spend a huge chunk of cash on professional dog trainers or read yet another dog training book that doesn’t get you results. http://bit.ly/1WronpC